I was hoping to get away with saving the keel and bottom but that is not going to happen. The keel is coming apart in splinters and dust! The previous attempt at restoration was accomplished by the pouring a 1/4" layer of rosen along the keel causing it to hold moisture and keeping the water from the drain plug.
It apears that the bottom plywood butts up to each side below the keel (centerline) and was fastened with nails only to the keel from the underside.
Is this consistent with orginal const? (1964 Seacoaster)
I also found the ribs connected to the keelsons from the bottom with one screw and one nail. There was an additional screw from the outside of the strake just under the side rail.
Is this consistant with original practice?
Will I find a screw into the ribs at each strake? In other words will there be 2 machine screws between each rib and a wood screw at the rib at the bottom edge of every strake or did they leave out a few?
What will I find?
Moderators: a j r, TDockside, Miles, Moderators
What will I find?
Larry B
The difference between a professional and an amateur is the Professional knows how to cover his mistakes, the amateur gets another board.
The difference between a professional and an amateur is the Professional knows how to cover his mistakes, the amateur gets another board.
Larry, your description sounds about right , at least as compared to my 57' Peshtigo built boat. I made sketches of the original construction details on my boat as well as the reconstructed arrangement. E-mail me and I'lll send you the sketches and descriptions. fixerjo@sbcglobal.net
Joe B
Joe B
Here's a basic cross-section drawing that I made some time ago.
Note the difference between the terms "keel" on the outside of the planking and "keelson" on the inside the planking.
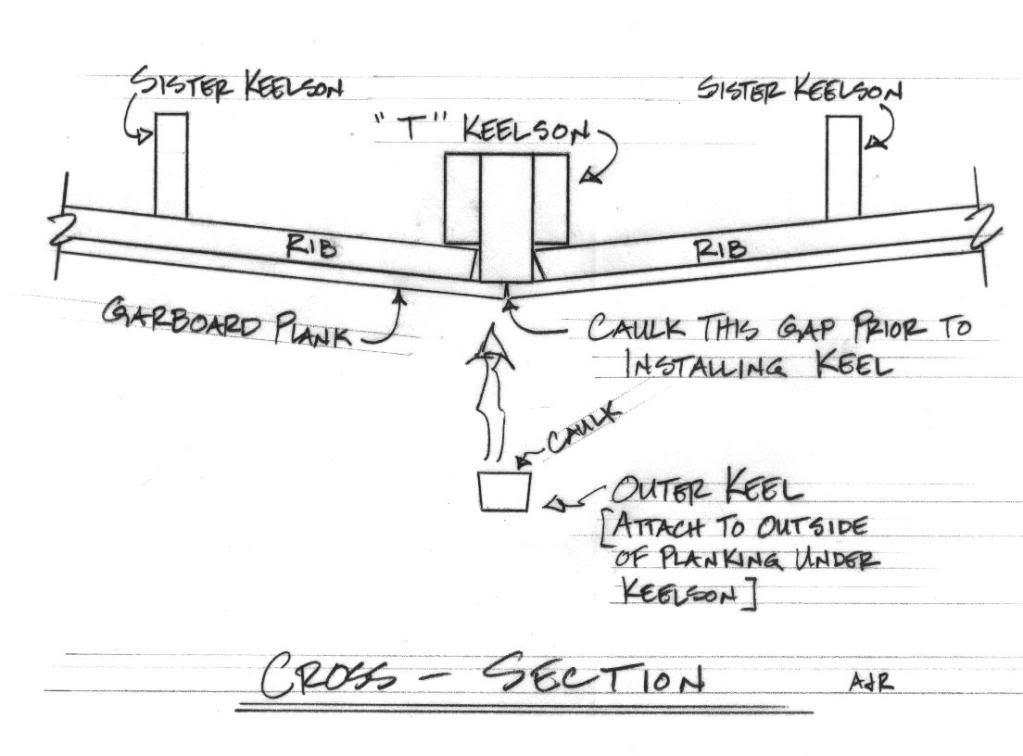
On all the boats I have tackled (Thompson of Peshtigo) there are nails and screws attaching the garboard plank to the keelson.
Hull planking is screwed to the rib at each lap joint. One screw goes thru two pieces of plywood hull planking where they overlap.
Hope this helps and good luck.
Andreas
Note the difference between the terms "keel" on the outside of the planking and "keelson" on the inside the planking.
On all the boats I have tackled (Thompson of Peshtigo) there are nails and screws attaching the garboard plank to the keelson.
Hull planking is screwed to the rib at each lap joint. One screw goes thru two pieces of plywood hull planking where they overlap.
Hope this helps and good luck.
Andreas
Thanks to you both!
That's about what I pictured, didn't want any surprises. The outer keel, is that attached with only 5200, or screws and/or nails as well?
That's about what I pictured, didn't want any surprises. The outer keel, is that attached with only 5200, or screws and/or nails as well?
Larry B
The difference between a professional and an amateur is the Professional knows how to cover his mistakes, the amateur gets another board.
The difference between a professional and an amateur is the Professional knows how to cover his mistakes, the amateur gets another board.
There should be "limber holes" at the junction of the ribs and keelson. They get plugged up with gunk. Get a wire coat hanger and make a little pokey tool to push the gunk out.
These limber holes are intended to let the water drain from bow to stern.
There also should be at least one hole thru the width of the keelson right in front of the transom. This will allow water to drain side to side.
Some knuckleheads caulk these closed. I have seen this on two boats I have restored.
Andreas
Thanks Andreas. That's great news to know there are drain holes fore to aft. I had read somewhere that Thompson started that in '63. I'm very glad to hear my '60 should have them.
The one and only time I've had it on a lake, it leaked badly. Once it was back on the trailer I left it sit at an angle on the ramp until all the water ran out of the drain hole. Then about a mile up the road we stopped at a store and when I came out there was a huge puddle under the middle of the boat and it was dripping from the keel area about mid ship, so I knew water had been trapped between the ribs.
Verne
I have removed 1 side of the garboard plank and have found every rib will need replacement. The Keelsons are toast. Because the previous resoration is mostly epoxy the screws are not coming out easily so I am using a Multi Tool and cutting between the laps. Many of the laps at the transom are about 1/8" wood and 2/8" epoxy.I just removed the outer mahogany board from the transom and found it a maze of either carpenter ants or termite burrows. I am beginning to think I would have been better off to have purchased a set of plans and built a boat from scratch. The one thing I keep reminding myself is that I have no timetable and I wanted a project that would use both my interests of boating and woodworking.
Larry B
The difference between a professional and an amateur is the Professional knows how to cover his mistakes, the amateur gets another board.
The difference between a professional and an amateur is the Professional knows how to cover his mistakes, the amateur gets another board.
Larry: I know what you're going through (except for the 2/3 epoxy). When I bought my boat (over ebay, only pictures) the seller said he didn't see any rot. How was I to know that he had a white cane with a red tip? Every rib just falls apart in your hand, along with the keeson and garboards. I have a lot of learning to do before I either give up or do the job.
Jim Tesno
looks like you may be getting into a big project, but it sounds like you have the ability and determination to see it thru. One of the great things about a wood boat is that's it totally repairable. Even in the extreme one can always use the parts and pieces as pattern to fab new. If you are not in a hurry all the better, view it as an adventure in wood working.
Good luck and keep us posted on your progress.
Joe B
Good luck and keep us posted on your progress.
Joe B